Category: Rug-How To
This section focuses on a how to hook rugs for people just starting out.

Rug Hooking 101: A How to Guide for Beginner Rug Hookers

How to Hook Rugs from Start to Finish
A Free Beginner How to Course in Hooking Rugs
compliments of Deanne Fitzpatrick Rug Hooking Studio
Hooking rugs is easy. You can even teach yourself. You pull strips of wool cloth, usually recycled clothing, washed , dried , and torn apart through a burlap or linen backing loop by loop. There are no hard and fast rules. The simplest way to learn is to pick out a kit at our online shop or you can start from scratch. We have a free instructional video to teach you how to hook. Either way these are the basic steps you will need to know:

Getting Started
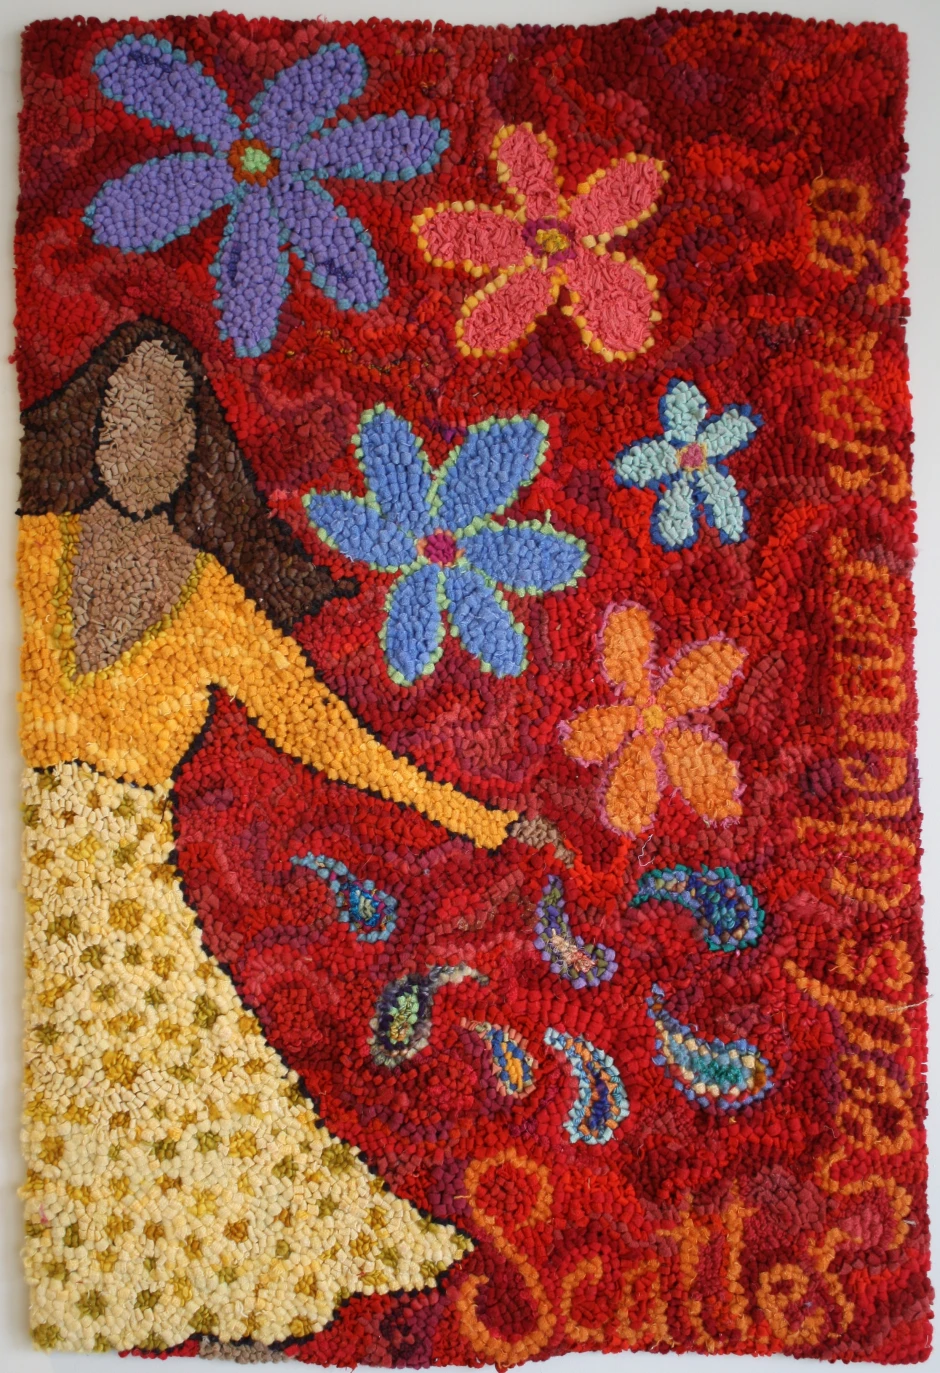
The rug above is my very first project. I went off to a meeting of the Nova Scotia Rug Hooking Guild at the Tatamagouche Centre and Marion Kennedy sold me a kit and and taught me how to hook rugs. As I was hooking, she pointed out some mistakes I was making and I asked her, “Should I pull it out and start again?” She said, “Don’t do that you will learn as you go along. Finish it, that’s your job, finish it.” With less than three square inches of the rug hooked this seemed like a dauntingly job but it wasn’t. It turned out that as I kept at it , I learned as I went along. I kept her voice in my head, “finish the mat” and I finished this first project with in a week, and quickly moved on to design my next rug.
Rug Hooking is a simple craft that you can easily teach yourself. I recommend a kit for beginners because you have everything you need to get started.Here are some basic instructions for rug hooking. You can also learn lots more through our online courses or studio workshops.

1. You first fasten your pattern, which is a piece of burlap with a picture drawn upon onto a frame such as a heavy duty quilting hoop, or a stretcher bar.
2. Cut a strip of wool cloth about one quarter an inch wide, and about eight to twelve inches long.
3. Hold your hook in the hand you use to hold your pencil, and the strip of wool in the other hand. Put your hook down through a hole in the burlap backing, and catch the piece of wool, pulling it up thru the burlap. Bring the first end right up through, then continue the hooking pulling it up loop by loop.
4. In primitive hooking , you generally start by outlining an area and then filling it in.
5.Continue hooking until the whole mat is done. Bring all your ends of wool to the surface and clip them evenly with your loops.
6.When you finish your project, cut the excess burlap away from the edge, leaving no more than two inches all around. Use this to bind the rug by folding it and sewing it along the backside of the rug. You can also use cotton twill tape to bind it along the edge.
7.The final stage is to press you rugs with a wet cloth and hot iron on both sides to even out the loops and give your rug a finished look

Videos and How To That Tell You the Basics of Hooking Rugs:
- Kits and Frames from the Studio
-
How to make your rug hooking into a pillow
-
A Lesson on Binding and Finishing Rugs
-
How to Assemble a Cheticamp Frame
-
How to Hang a Hooked Rug
-
The Art of Rug Hooking Video
Some of the kits from our online shop:


You can also learn on our online courses or studio workshops.
Please Share:


New Free Guide to Rug Hooking
When you Subscribe to my Newsletter List I will send you this…

I believe that everyone can make something beautiful.
I believe that you can make something beautiful.
You just need someone to show you how.
This full colour 18 page Guide to Rug Hooking will do just that. It will teach how to hook rug.
It will inspire you to create beauty everyday.
Subscribe to my newsletter in the box on the sidebar and we’ll email it to you.
If you are already a subscriber I’ll send it to you next week
Please Share:

Free Rug Hooking Course: A How to Guide for Beginner Rug Hookers Online

How to Hook Rugs
from Start to Finish
A Free Beginner How to Course in Hooking Rugs
compliments of Deanne Fitzpatrick Rug Hooking Studio
Hooking rugs is easy. You can even teach yourself. You pull strips of wool cloth, usually recycled clothing, washed , dried , and torn apart through a burlap or linen backing loop by loop. There are no hard and fast rules. The simplest way to learn is to pick out a kit at our online shop or you can start from scratch. We have a free instructional video to teach you how to hook. Either way these are the basic steps you will need to know:

Getting Started
The rug above is my very first project. I went off to a meeting of the Nova Scotia Rug Hooking Guild at the Tatamagouche Centre and Marion Kennedy sold me a kit and and taught me how to hook rugs. As I was hooking, she pointed out some mistakes I was making and I asked her, “Should I pull it out and start again” She said, “Don’t do that you will learn as you go along. Finish it, that’s your job, finish it.” With less than three square inches of the rug hooked this seemed like a dauntingly job but it wasn’t. It turned out that as I kept at it , I learned as I went along. I kept her voice in my head, “finish the mat” and I finished this first project with in a week, and quickly moved on to design my next rug.
Rug Hooking is a simple craft that you can easily teach yourself. I recommend a kit for beginners because you have everything you need to get started.Here are some basic instructions for rug hooking. You can also learn lots more through our online courses or studio workshops.

1. You first fasten your pattern, which is a piece of burlap with a picture drawn upon onto a frame such as a heavy duty quilting hoop, or a stretcher bar.
2. Cut a strip of wool cloth about one quarter an inch wide, and about eight to twelve inches long.
3. Hold your hook in the hand you use to hold your pencil, and the strip of wool in the other hand. Put your hook down through a hole in the burlap backing, and catch the piece of wool, pulling it up thru the burlap. Bring the first end right up through, then continue the hooking pulling it up loop by loop.
4. In primitive hooking , you generally start by outlining an area and then filling it in.
5.Continue hooking until the whole mat is done. Bring all your ends of wool to the surface and clip them evenly with your loops.
6.When you finish your project, cut the excess burlap away from the edge, leaving no more than two inches all around. Use this to bind the rug by folding it and sewing it along the backside of the rug. You can also use cotton twill tape to bind it along the edge.
7.The final stage is to press you rugs with a wet cloth and hot iron on both sides to even out the loops and give your rug a finished look
Videos and How To That Tell You the Basics of Hooking Rugs:
- A How to Hook Rugs Video Step by step
- Rug Hooking Instructions for Beginners How to Hook Rugs ….Step by Step
- Kits and Frames from the Studio
-
Frequently asked Questions for Beginners
-
How to Finish and Bind a Hooked Rug Video
-
A Lesson on Binding and Finishing Rugs by Brenda Clarke
-
How to Assemble a Cheticamp Frame
-
How to Hang a Hooked Rug
-
The Art of Rug Hooking Video
Some of the kits from our online shop
You can also learn on our online courses or studio workshops.
Please Share:


How to Hook Rugs, step by step
Please Share:


getting started in rug hooking for under $50

If you wanted to get started rug hooking we have
come up with a beautiful kit and an economical way to learn the craft.
for under $50 including shipping
This Summer Fields Kit (6″by 8″ ) is an inexpensive way to get you started rug hooking and includes everything you need. It even includes the shipping. In the pack you will receive cut wool cloth, textured wool and yarns to create the beautiful field, a hand drawn pattern on burlap, a hoop to stretch it on, a complete set of instructions and colour key, and a rug hook ( the same one that I use).
This kit is the perfect tool to teach yourself or someone else how to hook and use texture.
You can purchase this kit in our online shop


Please Share:


how to hang a hooked rug video with Deanne Fitzpatrick
Please Share:


Rug Hooking Instructions for Beginners

Basic Instructions for Hooking the Mat
Hooking rugs is a simple craft that you can easily teach yourself. The early settlers to North America hooked their old clothing on to burlap bags as a way of warming cold damp floors. It is an environmentally friendly craft� that recycles old clothing and cloth scraps. It requires no energy sources but your own hands, and is a beautiful meditative craft that you can do as the world goes on around you.
If you teach, please feel free to print off these instructions and share them with beginners compliments of www.hookingrugs.com , Deanne Fitzpatrick’s Rug Hooking Studio
1. Put your pattern onto an embroidery frame or quilting hoop. It should lie flat and be tight like a drum. As you hook, keep your burlap tight on your frame as this makes the hooking quite a bit easier.
2. Your wool should be clean and ready to use. You can cut it into one quarter to one half inch strips. A simple method for cutting wool is to take an eight-by-four inch rectangle of wool cloth, fold it accordion-style, and cut it into strips. This saves a lot of time and works best with five-and-a-half inch scissors as they have a shorter blade.
3. Take a strip of wool and hold it underneath your pattern. Take your hook, holding it in your hand as you would a pencil. Put the hook through a hole in the burlap, wrap the wool around the hook on the underside of the burlap, and pull the end of the wool up through the hole. Continue doing this with the same strip of wool, pulling it up loop by loop to the top side of your pattern.
4. It is a good idea to start by outlining something near the center of your pattern.
5. Continue to hook in every second or third hole, depending on the width and thickness of your wool. When your strip is used up, pull the end of the strip to the top side of your pattern, and clip the end so that it is an even height with your loops. Your loops should be one quarter to one third of an inch in height.
6. You can hook in straight or curved lines. Be careful not to cross the paths of your wool on the back of the pattern. Always clip your wool and start in a new place, rather than carrying a color across the back of your mat because this will make your rug bulky, messy and easy to pull out.
7. Continue to hook, by outlining and filling in all the areas of your rug. Do not hook too tightly or your mat will not lie flat. It is the packing of the loops together that keeps the loops from falling out, but if you pack it too tightly your rug will curl up.
8. There are many ways of finishing the edges of a rug. You can sew by hand black cotton twill tape around the outside edges of the rug. Hook right up to the twill tape, or sew it on after the rug is hooked. When your rug is complete, you can roll two inches of the excess burlap into the twill tape and hand sew it along the backside of your rug. If the rug is going on the wall, you can fold the excess burlap along the back side of the rug, and sew it up. I like to press the rug with a hot iron and a wet cloth. This is called blocking the rug and it helps give the rug a finished patina and even out the loops.
9. When you hook, try not to go from left to right but cover many parts of the rugs area in case you should run short of wool. If you do this you can always add more wool of a slightly different color to complete your rug. It may even enhance the primitive quality of your design.10. Hooking rugs is meant to be a pleasant pastime. To avoid getting sore shoulders or hands, take lots of breaks, and make sure you are sitting in a comfortable position and that your body is relaxed. If you are comfortable, relaxed, and have support for your back, the hooking will go along much more easily.

�


Please Share:


Excerpt from dvd
A three minute excerpt from my new DVD, that shows basic how to hook instructions, has been posted on nthe site. It gives basic instructions on how to hook a rug.

